Dancing Glitch is a 2.5 minute long movie that is based around footage from the Louis Lumière film Danse serpentine, vue no. 67, featuring the American dancer/choreographer Loïe Fuller, shot in 1896. I selected the original footage for several reasons—among them my love for Art Nouveau design—the version that I chose was hand tinted, animating the color; the digital file was compressed, but not so much as to have lost all detail; the “Serpentine Dance” that Fuller famous has an indirect relationship to early abstract art and Cubist painting, giving an added dimension of interest to the types of visual fragmentation and abstraction common to digital glitches. Making this short film the starting point for my exploration of how digital movies create abstract-yet-representational art when subjected to various forms of glitching gave an additional layer of conceptual depth to the result.
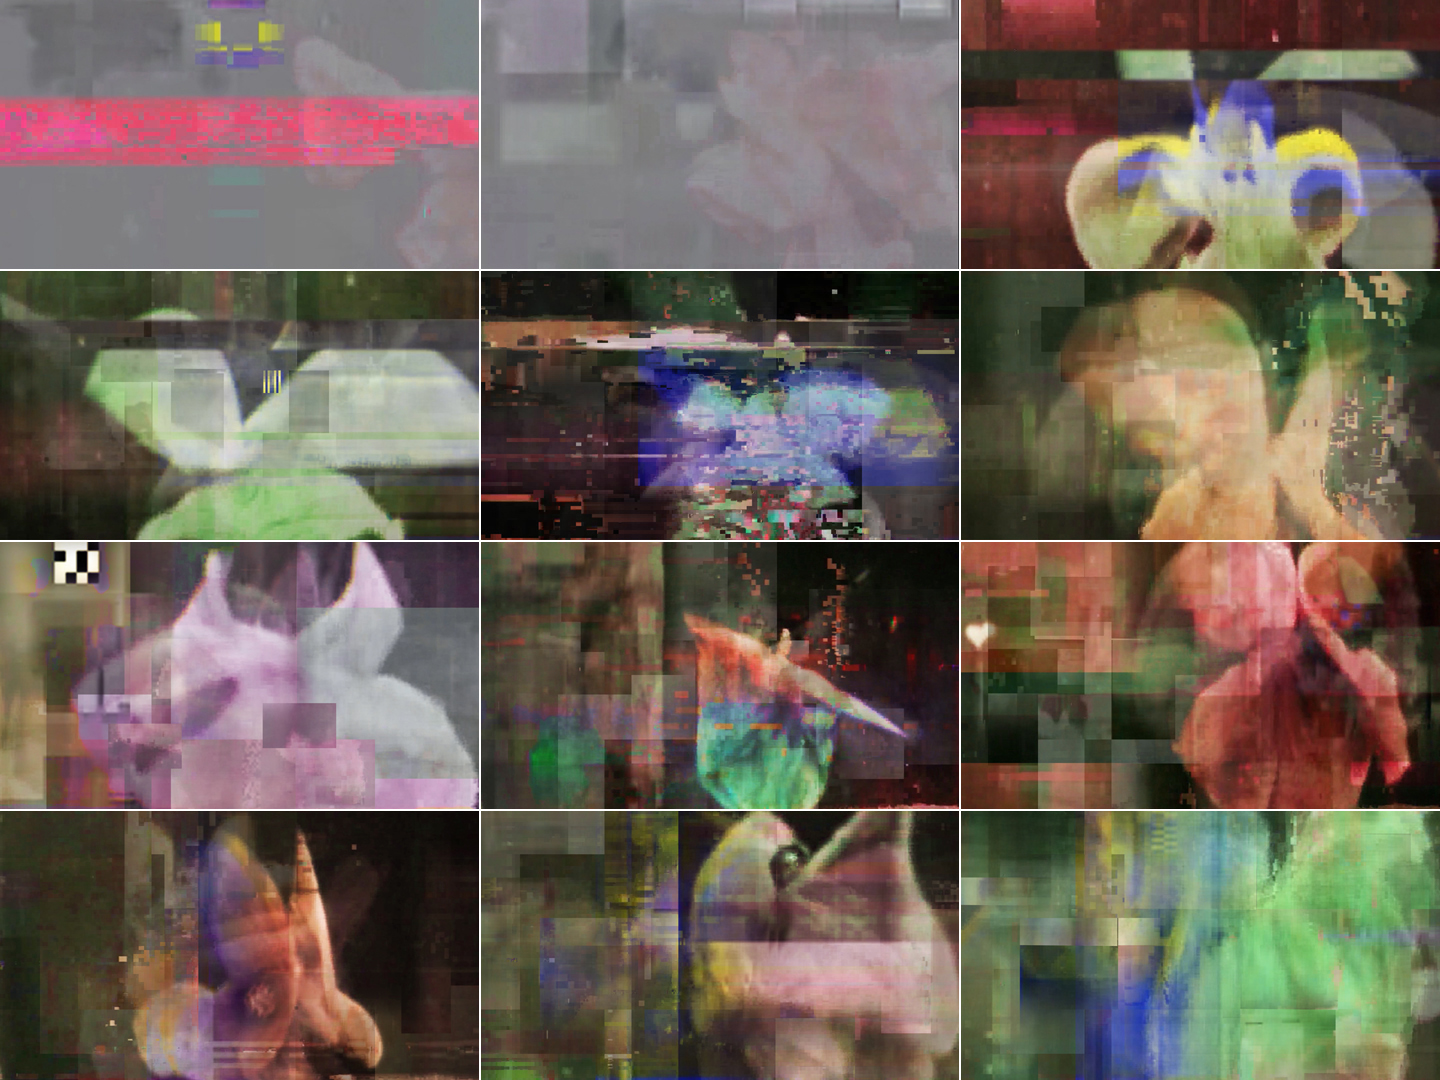
Figure 1: Stills from Dancing Glitch (2013)
This movie builds on a long personal involvement with technical failures or malfunctions: my first works with glitches were done in 1991 and 1992 using the digital freak-out that would happen when breaks in analog video time code collided with the digital frame buffer of the NewTek Video Toaster. By the mid 1990s, I was working with video feedback, rephotography off TV and computer screens, and the artifacts of defective compression caused by shuffling between formats and codecs. All of the raw material would be polished into something seamless, bright, colorful—features that have remained a common part of my work. By 2003, glitches were my main source material, and the formal connections between my work and historical art struck me every time I started working on a new project. It was through this engagement that I developed the various instructions described in Structuring Time, adapted into the Eupraxis deck.
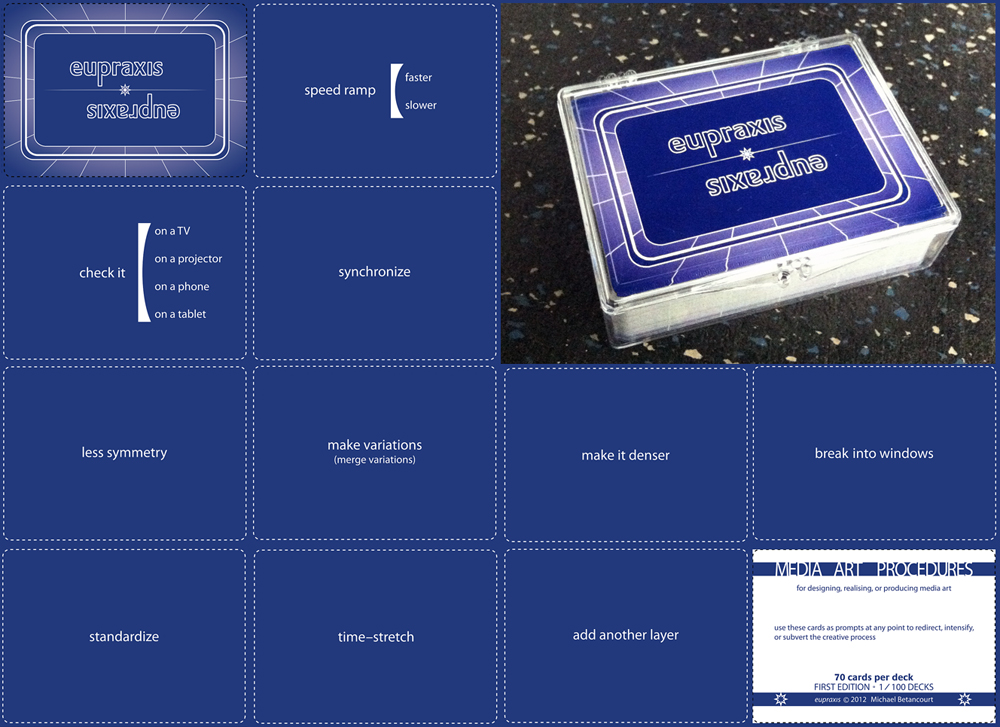
Figure 2: Eupraxis Media Art Procedures deck with sample cards (2012)
The central part of this production process, the Eupraxis Media Art Procedure cards, were assembled and edited over a two year period then printed in fall 2012 [Figure 2]. I selected a name that means “good process”—eupraxis—as an emblem for their role in my work. The deck is composed of 70 cards: one edition/label card, with the rest being particular directives—for example “synchronize,” or “shrink, enlarge, pixelate” or “remove your favorite shot”—the purpose being to force me to re-engage in a different way by shifting my technical approach. They are a translation of my heuristic that I began formalizing in 1998 as a set of media (but not medium) specific techniques that I published in 2004 as Structuring Time; both glitch and glitching were an essential part of this theory. The reason I did finally produce these cards was precisely because the instructions they provide are direct—the procedures all have very specific applications in a finished work and are usually immediately applicable. The degree of similarity to other, existing, projects was a stumbling block in their development. As a formal tool, they are related to other, earlier artist’s projects such as Brian Eno and Pete Schwartz’ Oblique Strategies. My final decision to produce the deck was utilitarian: it is easy to draw a card.
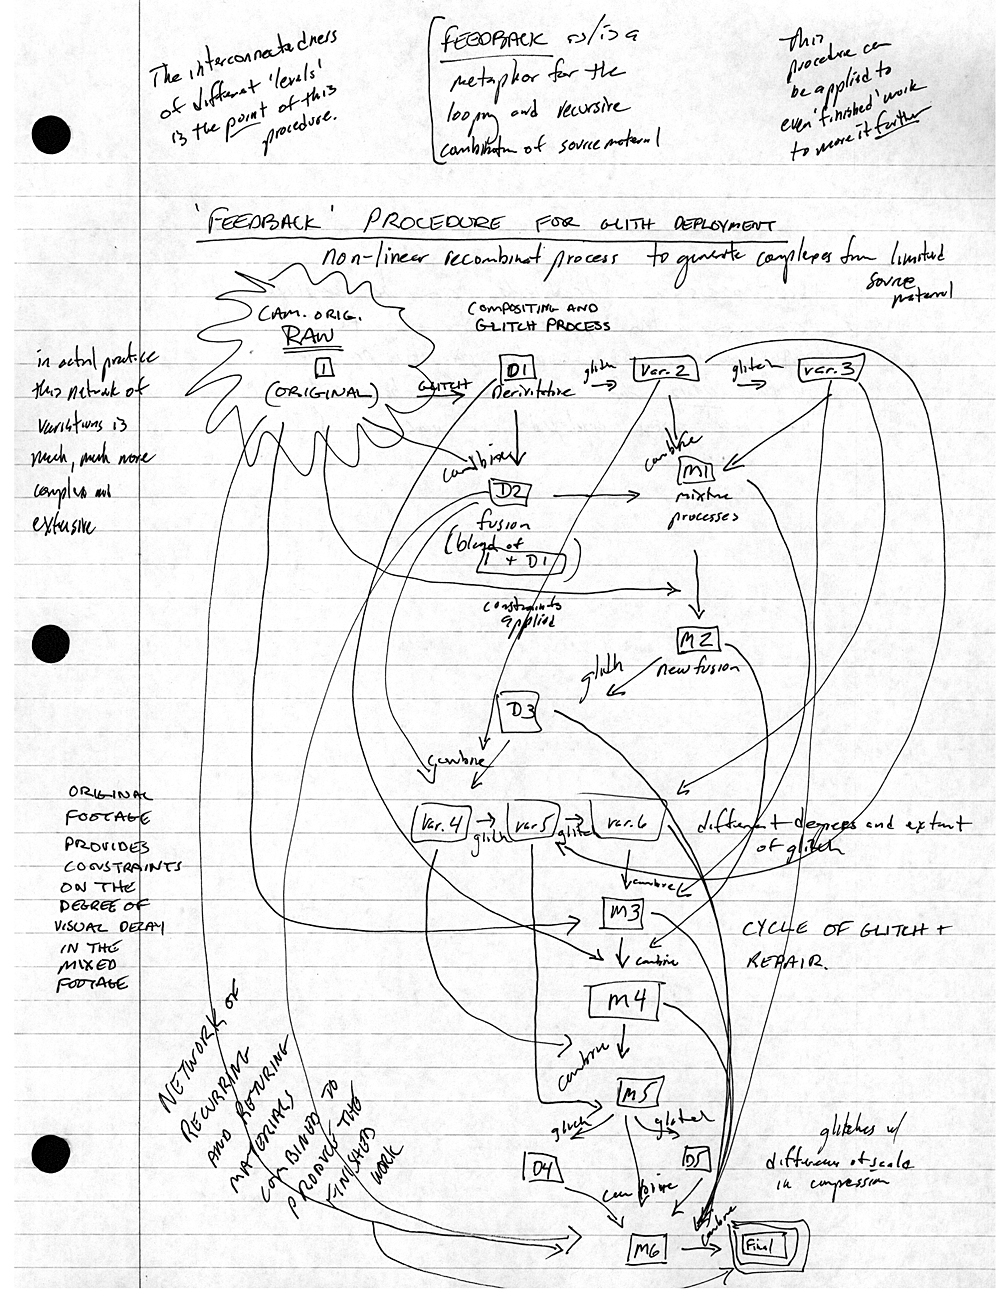
Figure 3: “Feedback” Procedure for Glitch Deployment, work flow diagram
My working process employs a variation on the idea of “feedback” where the output of one stage becomes material to be glitched, manipulated and then mixed back into the original raw material. This process [Figure 3] works well with both compressed and uncompressed video formats (but can amplify the grid implicit in compression). The re-direction my deck provided, both during the assembly of the finished movie and in the kinds of manipulation the source materials were subjected to during production, is reflected in the finished movie: animation, digital compositing, databending, datamoshing [Figure 4], and decryption errors were all employed, often repeatedly, in creating the final movie.
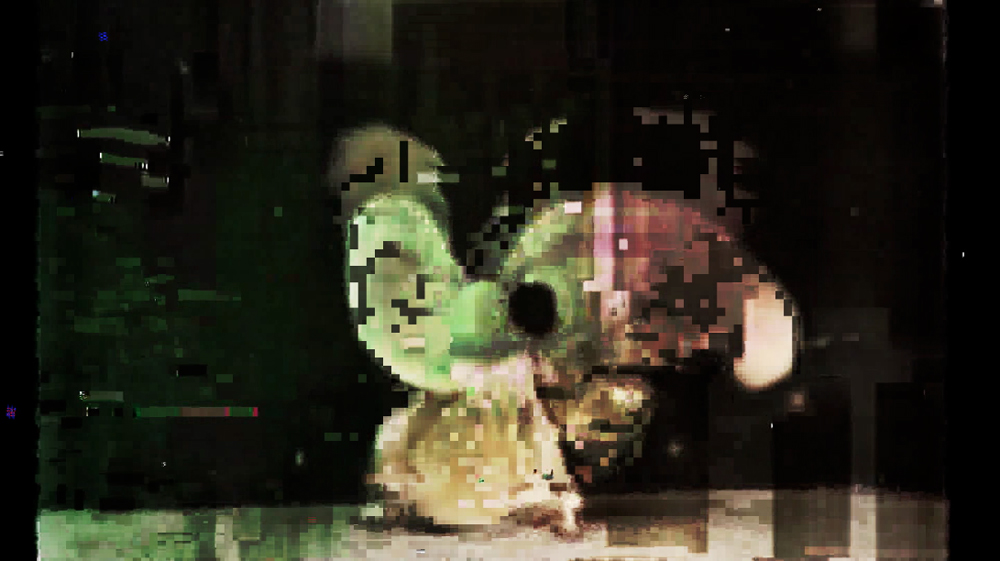
Figure 4: Still frame from datamoshed source material
Since my use of digital systems descends from optical printing’s recombination of existing materials, this process of iterative recombination can proceed very efficiently because the software I use for digital imaging (Adobe Premiere, Photoshop and After Effects) all interoperate. Dancing Glitch ultimately went through twenty-two distinct iterations, five rounds of glitch and reglitch, three synchronized variations on the final soundtrack and the final, finished version of the movie required a single 42-hour long render in Adobe After Effects on a then-new Apple computer to produce the uncompressed master file. The full running time, with end slates, is two and a half minutes.
1.
Video 1: Louis Lumière, Danse serpentine, vue no. 67 (Serpentine Dance, November 25, 1896)
Transforming the source footage into something that I would work with required two distinct actions: first, it was databent in three ways: by altering the hexadecimal code of the compressed source; by converting the original file to an uncompressed format and editing it as a .raw file in Adobe Photoshop [Figure 5]; and by removing I-frames to create a datamoshed effect. These variations were compiled to stabilize the uncertainties introduced by the various glitch techniques into a single 6.5 minute video that was made with screen capture at the HD video resolution of 1920×1080, which became the raw material for my first assembly edit.
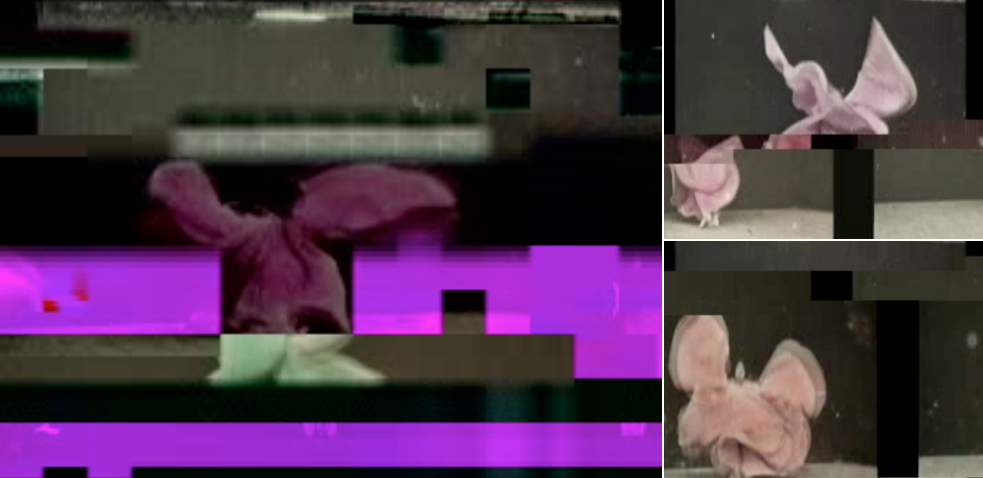
Figure 5: Still frame from .raw manipulated source material
The final image [Figure 6] is an overlay based on a 1902 photograph by Frederick Glasier. I selected this image precisely because it is well known. It serves as an anchoring for the rest of the abstraction and glitches, drawing the complex repetitions and other overlaid imagery back to its source in representational imagery.
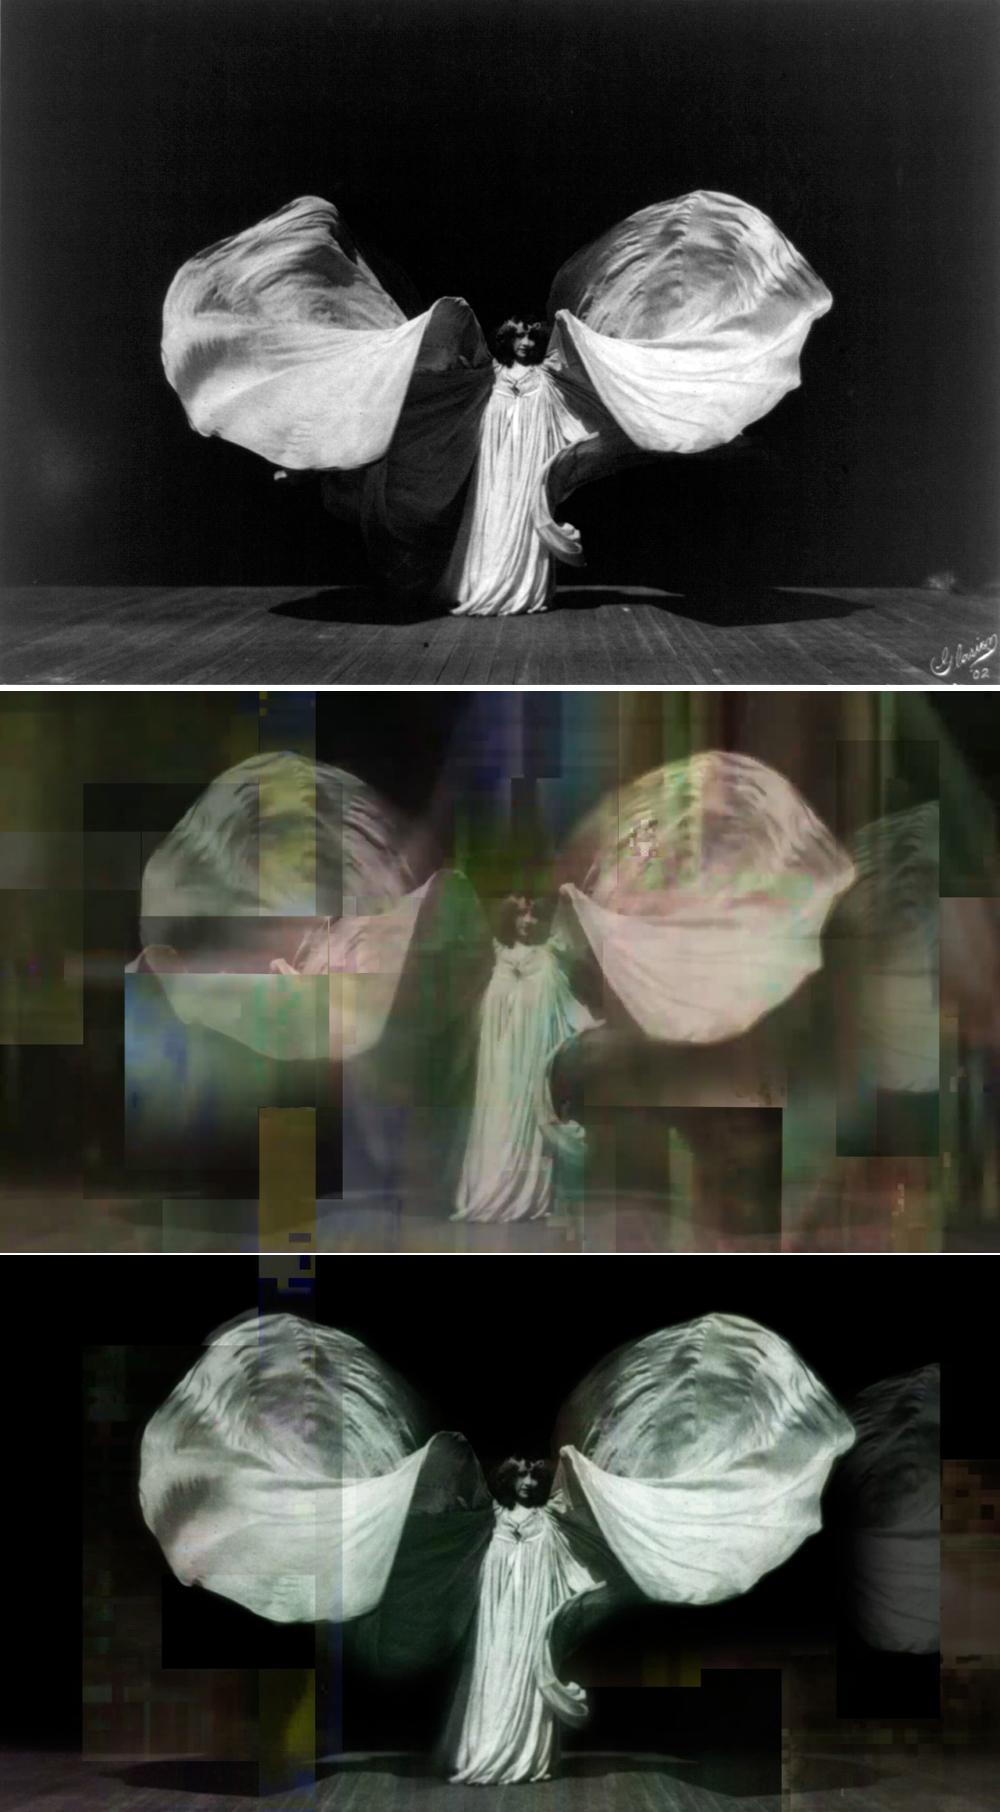
Figure 6: top, Frederick Glasier, Portrait of Loïe Fuller, 1902; bottom, stills from Dancing Glitch
2.
My Eupraxis cards determined how each step would proceed from this point onwards. I drew several cards to frame the initial conditions. The first card was “SYNCHRONIZE” which guided both the soundtrack and the layering of different variations together. Because the entire movie was drawn from a single long take, the overlay of variations on the same shot resulted in striking discontinuities and interference patterns that were strongly constrained by the underlying imagery.
Video 2: Compilation of glitched source material
The next two cards drawn were contradictory: “TIME-STRETCH” and “MAKE IT SHORTER” were applied to individual shots and the entire composition, moving it in opposite directions as it progressed (the running time varied between 3:25 minutes and 2 minutes at different points in its construction; no rendered-out version was longer than 2:30); “CHECK IT” each version from this point on would be tested on a variety of displays (TV/projector/phone/tablet); and “LESS SYMMETRY” which I applied to how the looped footage behaved—the loop-point in the footage would not be the middle of the shot.
Video 3: First test assembly
This initial edit went through several revisions using Adobe After Effects, compositing the variations together and slowing them down, including setting some ‘shots’ to run ‘backwards.’ The general shape of the movie emerged from this initial ordering of materials. The final run time was just under 2 minutes.
3.
“ADD ANOTHER LAYER”—once I had the basic assembly in place, my next concern was to begin synchronizing the layers of glitches so the different iterations would line up at the same points in the video: this process required correcting for the lost frames due to glitching.
Video 4: Final test assembly
Correcting for shifts in duration—due to a changed time base because the glitch techniques I employed tended to drop frames—was a continuous concern with each later iteration as the project developed because each newer version provided new “raw” footage to combine with the existing edit/composite. Only the last iteration actually replaced the whole frame; new glitches would be broken into feathered ‘zones’ and blended into what was already there, giving it a greater complexity and movement without making a radical change to what was already on screen. The five distinct iterations produced by this process became raw material for a second sequence of databending and the process repeated, adding them to the composite as new layers.
4.
There were many small issues that could not readily be corrected with compositing; instead of rendering the layered composite as a video file, I output the entire movie as individual frames (occupying approximately 35 GB worth of disk space), a conversion enabling very precise single frame manipulations: frame-by-frame “hand” animation, including bridging colors to smooth transitions, animating an opening to the yellow-blue animated “explosion” in the first fifteen seconds [Figure 7], and redrawing small sections where the glitched footage behaved in an inconsistent fashion across an edit or between different overlaid layers.
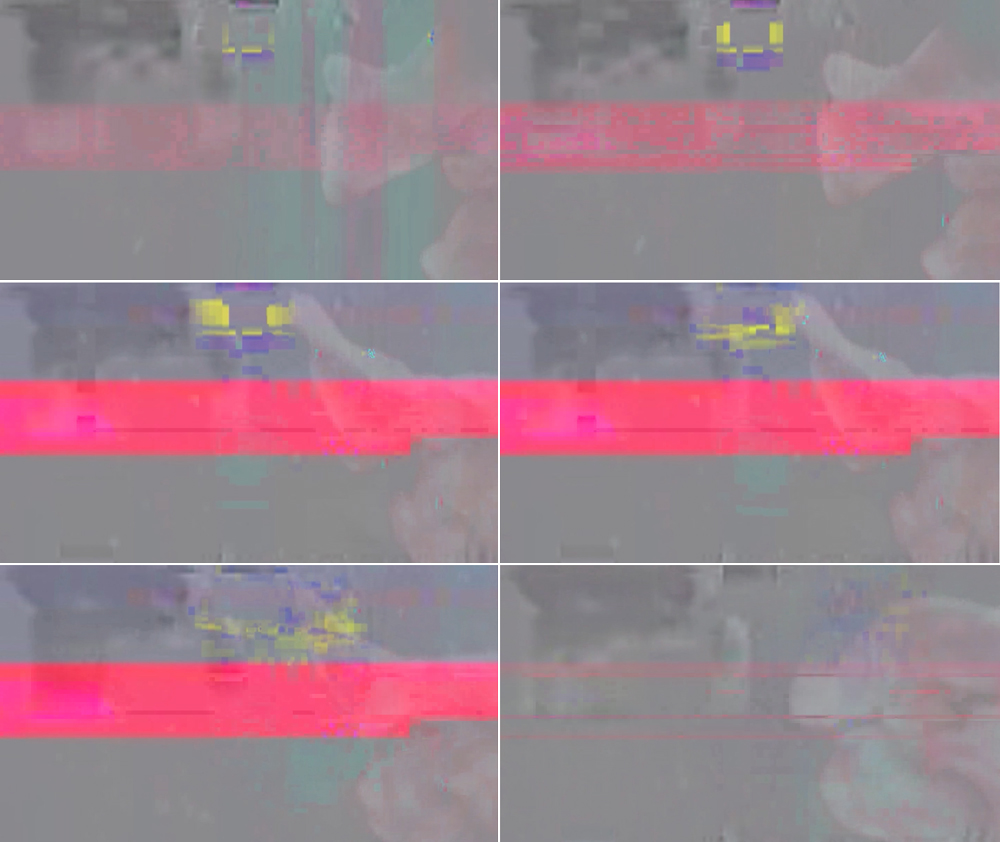
Figure 7: Animation of the opening ‘explosion’ from Dancing Glitch
Color continuity was an issue with the glitched footage: often there would be a dominant, highly visible color field that would blink on and off screen over only a few frames, a factor that became more distracting with the speed ramping and editing of the footage. Looped footage, either repeating the same shot, or from using two similar versions of the same action, made these color repetitions distracting and easy to recognize. By allowing the colors to carry across and elide some of the layering/edits, the result was much more fluid and created transitions that were between two and six frames long. The opening sequences playing over a grey background required some of the most elaborate animation/color retouching. Small elements were extended, flickering was taken out and short animations were created around elements I isolated during the assembly edit.
In addition to this general “clean up” of the assembly, there were two major alterations made to the single frame sequence:

Figure 8: Frames showing photo-retouching to source material
(A) There were points where Loïe Fuller’s black hair appeared as a blob moving across the swirling forms in a very distracting way that interfered with the ambiguity of the image (person/dancer/abstract organic form). Short stretches where this shape was especially distracting were fixed using Adobe Photoshop [Figure 8] so her head would not longer be visible, resulting in very dynamic movement that takes on an inhuman character—enhancing the impression that the moving form is a flower or other organic shape rather than a dancer was the ‘rule’ guiding which groups shots, usually only between 8 and 10 frames long, would be retouched.
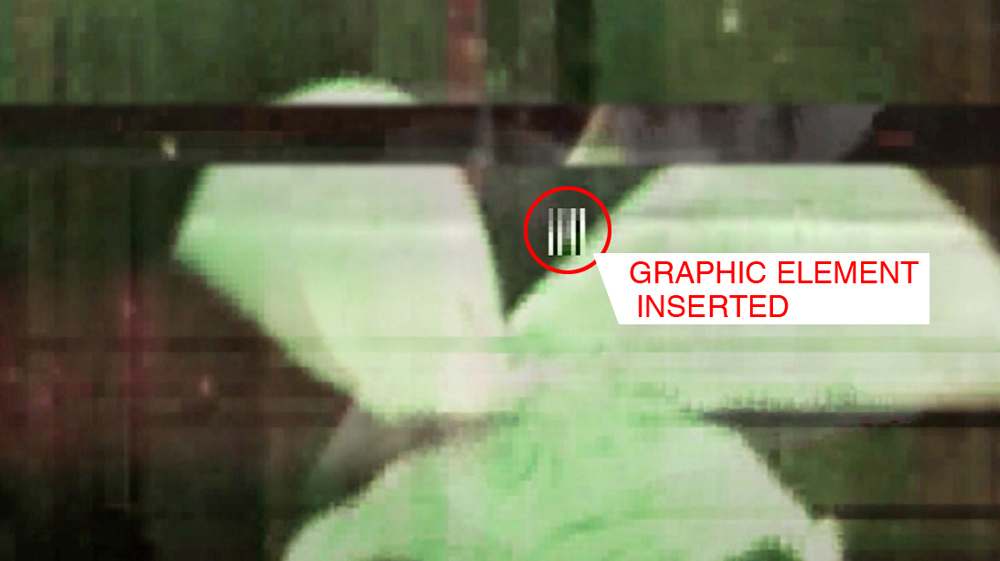
Figure 9: Frame showing graphic element inserted into photo-retouched frame
(B) Graphic elements were added to specific shots in the first third of the movie (a QR code, patterns resembling black-and-white bitmap glitches, etc.). [Figure 9] In two cases, the animating these graphics provided additional visual material that hid some of the less-than-seamless retouches. A strongly graphic element moving in close proximity to a subtle error in texture will make that error impossible to detect.
Video 5: Still test to evaluate photo-retouching
These were major alterations that required testing and evaluation of the results. Often this meant that retouched sections required several passes to achieve an appropriately invisible effect. There were nine still tests looking for smoothness of the animation, the invisibility of the changes made and identifying subtle issues that might need correction as a result of these changes, such as continuity of color. The goal of this process was to hide the changes so the audience would focus on what appeared on screen, rather than the assembly (this process also helped mask some of this assembly process).
5.
“CHECK IT”—in projecting the movie what was immediately obvious was how limited the tonal and color range was, a factor that wasn’t as noticeable on smaller screens but which was very obvious when large: the footage was red, green, brown and black with very few moments containing any other color such as blue. In the second half of Dancing Glitch these limitations created long, almost monochromatic sections that felt much longer than they actually were.
Video 6: Minus-red source material
The videos made for still tests 5 and 6 provided the foundational material for two variations focused on changing the color values. This was done by assigning these videos to different color channels, time stretching one by no more than 3 seconds overall, and then allowing their subtle differences to generate color mismatches. I made two versions: a three color version, and then a two color version lacking the red channel. It was the second (minus-red) version that I added to my composite, creating bursts and color overlays of blue and yellow in the final third of the finished movie. The top image in Figure 10 shows the minus-red version compared to, at bottom, its use in the finished movie.
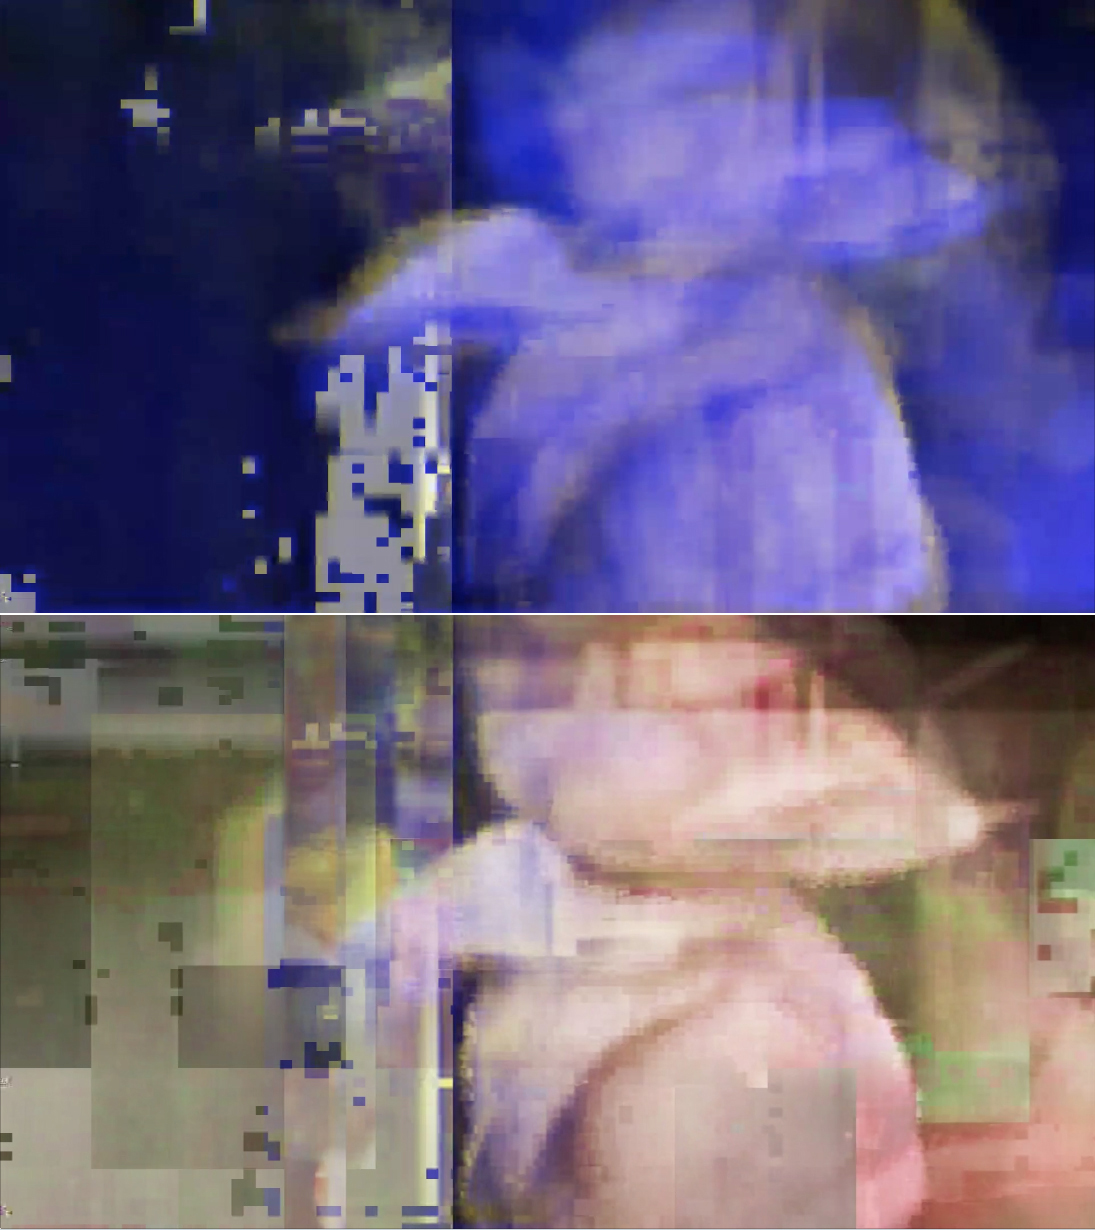
Figure 10: Comparison frames, minus-red source material and use in Dancing Glitch
6.
“IS IT FASCINATING?”—after finishing the adjustment of the stills and blending the color pass into the footage, the full set of stills and color material was compiled into a test. The render took approximately 30 hours to complete.
Video 7: Composite test
This Eupraxis instruction has a very specific valence for me: my works that can hold my attention for repeated viewings all have something to them that engages me simultaneously intellectually and experientially. Dancing Glitch still felt incomplete. While the flickering, spinning Fuller seemed to both advance and retreat at the same time (a result of adjusting the footage so her movement and the ‘camera’ movement were in counterpoint), it was clearly lacking sufficient visual complexity. Adding sound at this point would simply hide this problem rather than fixing it.
7.
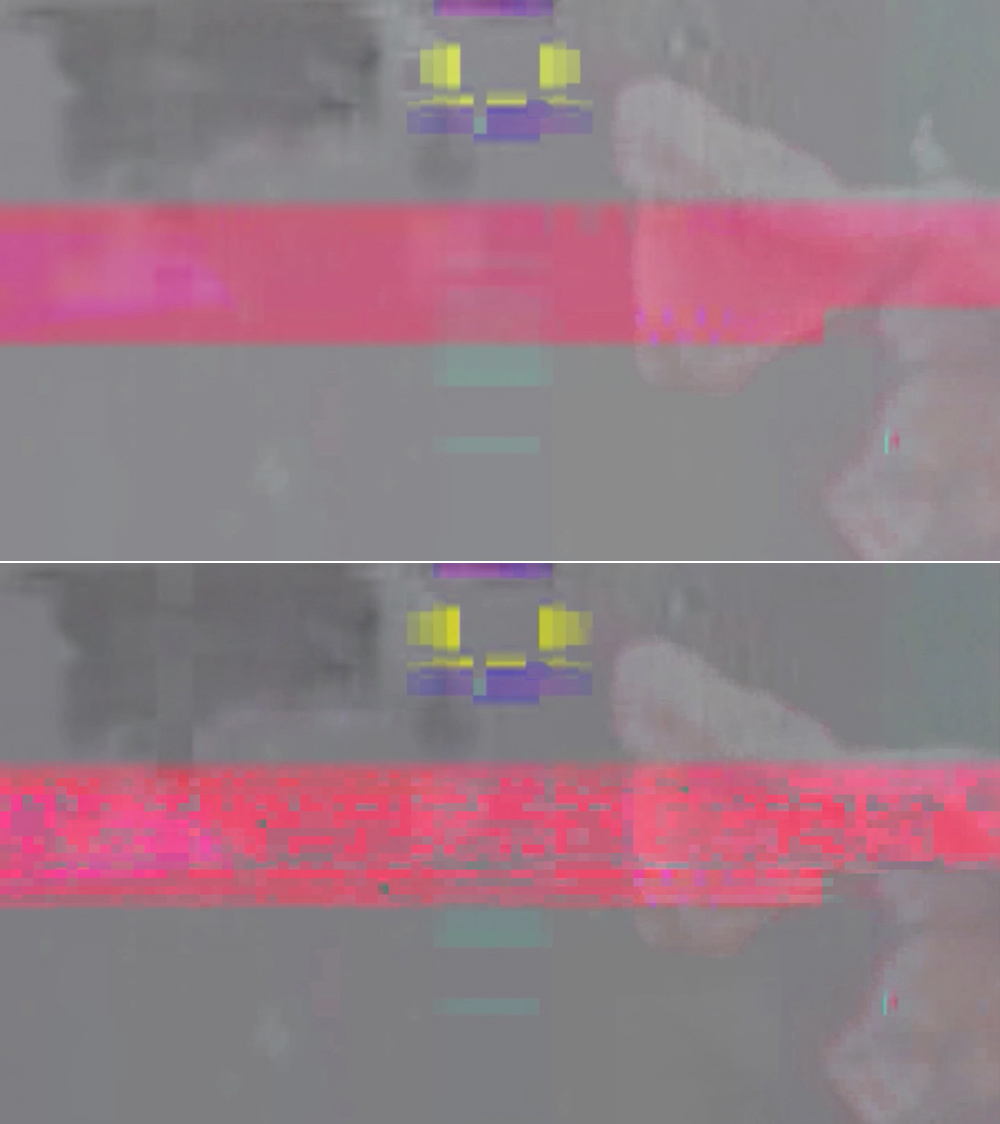
Figure 11: Comparison frames showing use of reglitched source material in Dancing Glitch
“GLITCH IT”—final glitch pass. The rendered composite was compressed into a cell phone friendly format with only about 1/4 the resolution of the HD file and this highly compressed and reduced resolution file was data bent. Glitching this format resulted in a breakdown of the image into bands. This footage was reintroduced in a limited way throughout the movie: the pink bar which appeared and then vanished now decomposed into grey [Figure 11] because of the new glitched footage. Several of the spinning shots were mixed with the newly glitched kinetic bands whose moments were isolated and worked into the existing composition [Figure 12].
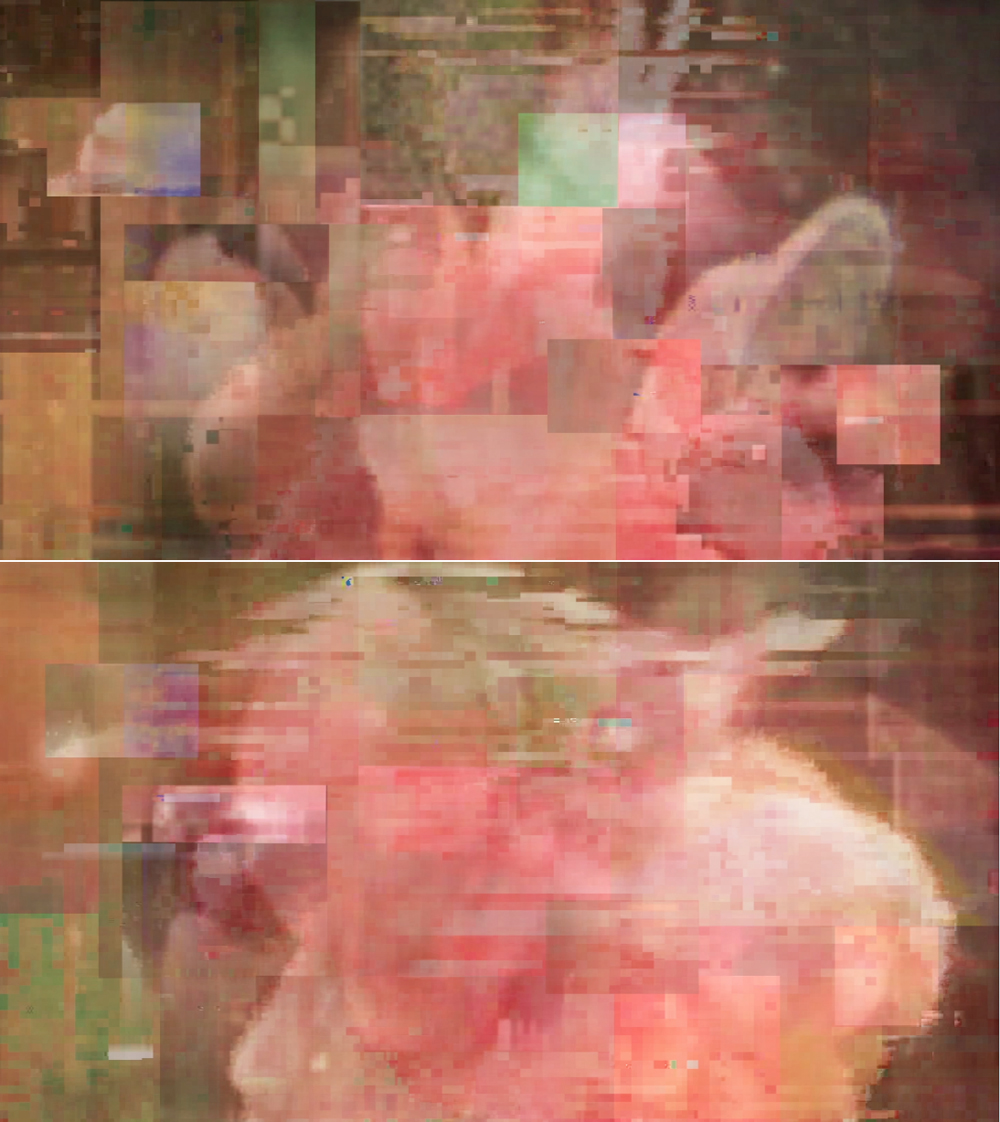
Figure 12: Use of reglitched material in Dancing Glitch
The advantage of reglitching a highly compressed cell phone video format was the time base remained constant even as the boundaries between frames stopped working. The alignment of newly glitched footage with the existing movie meant that the bursts of glitch would follow the same timing and movement as the original. Because the new glitches were smaller than the existing glitches, they contributed a new scale of breakdown, further “atomizing” the motion and composition: glitches within glitches are apparent throughout this footage.
Video 8: Composite with re-glitched source material
8.
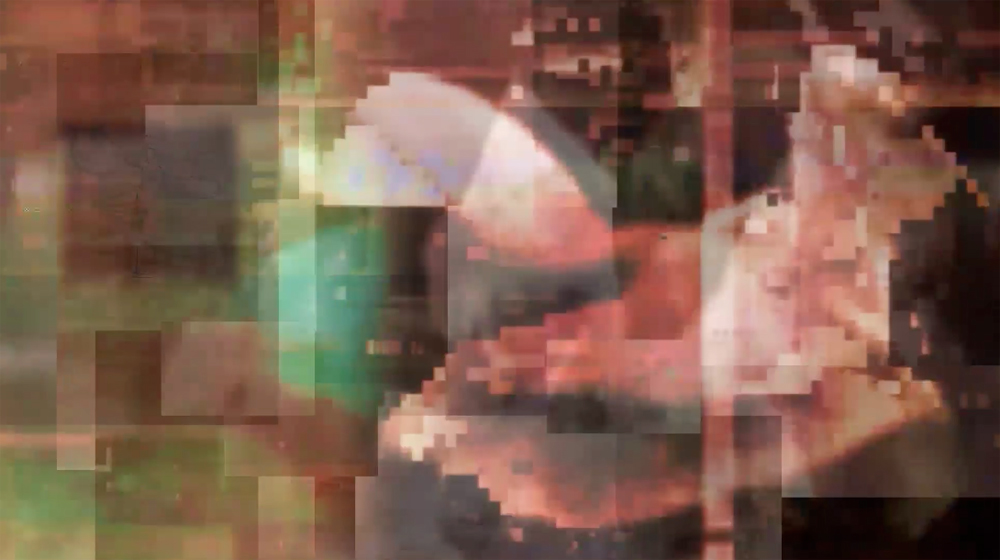
Figure 13: Matrix test image showing fragmentation of image
“BREAK INTO WINDOWS” was accomplished by creating a duplicate of my ‘final’ composition and then chopping it into smaller windows, each with a different time base—some were stretched, some compressed—none more than 10% away from the ‘original’ duration. This new, windowed version provided a matrix [Figure 13] that could be blended with the original, unwindowed material. This combination went through three tests to make certain the combination was fluid and seamless. The individual windows worked best when their timing was closely linked to the original, resulting in subtle one and two frame long discontinuities, but still having clearly visible window edges. With each new rendered test, the number and complexity of windows and the blending with the overlaid original increased in complexity.
Video 9: Matrix test video
This fusion of windows and glitched material worked quite well. Glitched video tends to reveal its underlying encoding—the macroblocks employed in compression—creating a highly visible break up into boxes and clearly fragmented imagery. The addition of windows forced a decision about where the edges would fall and aligning them with the glitched material seemed logical given the fluidity and seamless assembly of the rest of the movie. This decision worked well since the recombination of the windowed material with the original footage resulted in these windows status—as glitch or not-glitch based—being difficult to determine.
9.
Sound posed a problem for the final composite. The rhythms and actions on screen did not follow any standard time base (some parts were accelerated by the glitching and then corrected, while others were speed ramped during compositing, and the entire piece was stretched then compressed into a run time of 2:15 before adding the title cards at the end.) I created three distinct soundtracks as separate compositions, which were then edited together and mixed down so the different synchronized elements would overlap and blend as an analogue to the fluid glitched imagery.
Audio: Soundtrack mixdown tests
“SYNCHRONIZE” was the Eupraxis instruction for creating the soundtrack. The picture provided multiple “events” on screen that seemed to require some audible support. I built the mix from three different, but all synchronized soundtracks that were prepared independently of each other. That they all used many of the same “events” meant that they could be simply cut at any point and would remain in sync with the images. These soundtracks all drew from a sound library I have building on since I lived in Miami the mid-1990s that includes NASA/JPL plasma wave sounds, glitched noises saved from sound experiments, and midi sequences converted into .wav files and then distorted so the harmonics dominate over the original tones. My relationships with DJs, sound artists and composers in south Florida had a strong influence on the kinds of materials in this library, and the approaches I still employ when creating a soundtrack.
All the soundtrack variations have the same ambient foundation (basso continuo) made from an autotuned room tone loop. The first soundtrack mostly used glitch noises—blips, clicks, beeps and other electronic sounds—and provides the most apparent structure to the soundtrack because they are all short and clearly linked to particular visible screen events: the opening yellow-purple ‘explosion’ animation, various glitches that blink on and off, obvious edits. The second contains musical scales and other tonal elements whose impact was more appropriate for a horror film; and a third soundtrack was a built from ethereal oscillating harmonics derived from a sixty second .wav file generated from a midi version of J. S. Bach’s Prelude in C major (BWV 846) performed by one of my older computers. These three versions were then combined in several variations so they could play off of each other. The finial mix contains elements from all three, often at the same time.
Finished movie: Dancing Glitch, Michael Betancourt (2013)
Dancing Glitch raised very particular questions for me about the nature of glitched material and the procedures employed in creating movies with that material. These issues have been a background concern for me since the 1990s when I began working with technical failures of various kinds: much of our ability to identify something as “broken” or “glitched” depends on both context and expectation. The process employed to make the work, in my experience, is irrelevant to this identification. The paradox of a desired glitch whose production was the focus of the technique employed is a different issue than the formal presentation of these “failures,” whether the glitches being seen are part of the work, resulting from a transient technical failure, or a combination of them (there is no reason why a recorded glitch cannot be also be glitched by a new technical malfunction). However, what Dancing Glitch demonstrates is the fluidity that “glitched” materials have: it is impossible to distinguish between the recorded glitches, the graphic elements, and the hand animation.
Really interesting view inside this process. One rarely gets to see such detail about how a work is made!